

Not got the time to get a passport photo? Get started today using this article! The most important part of a successful passport application is a compliant passport photo. Make sure to use a professional service that knows the ins and outs of the requirements. Keep reading to find out how to take a passport photo at home. Let’s go!
How to Take a Passport Photo at Home?
Getting a passport may sound like a hassle, but it shouldn’t have to be. If you get a professional, compliant photo, most of the work is done. Need to find out how to take a passport photo at home? Use the information below to find out more.
Using a Passport Photo Generator
If you’re thinking about getting a passport photo using a passport photo generator, usually, choosing a professional paid passport photo generator will give you the best results.
Typically, free services do not provide compliance checks. This means that when using them, you might not get an acceptable photo, causing delays to your passport application.
Passport Photo Generators
idphoto4you: Produce a passport photo for your travels. You can crop your photo once uploaded, though there is no check for compliance.
Pros
- Cropping feature available
- Multiple sizes available
Cons
- No compliance check
- No face detection check
123passportphoto: No background removal, but you can create most identification document photos with this website.
Pros
- Cropping feature available
- Background enhancement
- Suitable for 600 dpi printing
Cons
- No background removal
- Need a photography camera
Using a Passport Photo App
The same goes for using a passport photo app, you should prefer using a paid service as you’ll get a quality product that will be accepted by the government.
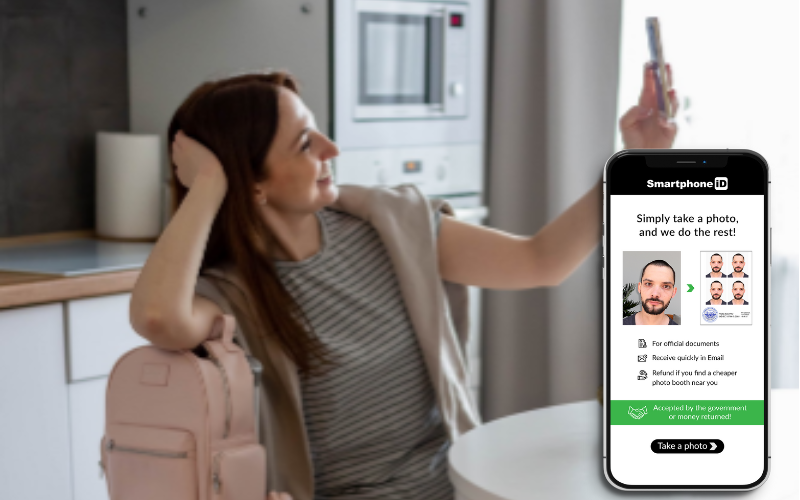
Smartphone iD App: If you want to create approved passport photos for your passport using your smartphone you can receive them via email or post. Smartphone iD is the first mobile app that allows users to take passport photos directly from a smartphone.
Pros
- Get a conform, verified photo for ID, passport and Visa via email or post
- Compatible with various countries around the world
- Quick and convenient, everything’s done for you
- Simple to use
- Best price for all-inclusive service
Cons
- The free version doesn’t include a compliance check
Ensure These 5 Conditions at Home to Take a Successful Passport Photo
For the best results when taking your photo, you should follow the official guidelines that the government sets out. However, there are a few additional tips that you can follow to help you get a photo that is more likely to be approved.
What Kind of Background is Needed
The background in your photo should be a plain white background without textures or shadows. Ensure there are no objects or other people in the photo.
The Importance of Good Lighting
The colour and hue of your photos must be as close to reality as possible. There shouldn’t be any deep shadows or glare on your face – ensure even lighting across your face. Use natural lighting without any after-effects or filters.
How to Pose
When posing for your passport photo, make sure your shoulders are squared and upright. You should keep your head up and face the camera directly, whilst looking into the camera.
What to Wear
Wearing colours that are patterned can be a distraction, so it’s best to wear plain colours that will not interfere with the purpose of the passport photo, which is identification.
Wearing darker colours is recommended as the background of your passport photo should be a pale colour. Dark colours will contrast with a white or pale neutral background, ensuring a good-quality passport photo.
Things like camouflage and reflective or metallic materials are not suitable for wearing in a passport photo. So make sure they’re not part of your passport photo outfit!
Face Expression
When you take your photo, you need to be directly facing the camera as well as have a straight posture with eyes directly at the camera lens. Keep a neutral expression. Once you’ve taken the photo, make sure your nose is in the center and your eyes are a third from the top of the photo.
Which Tool to Opt-in to Take a Passport Photo at Home (Checked & Verified)?
If you’re thinking about taking your own passport photo at home, you’ll need to find out about which tool to use. Take a look at the points below which will help you to choose.
Which Tool to Opt-in to Take a Passport Photo at Home
- Compliance Check: It’s important to make sure your photo is correctly produced and in line with government standards. To be sure of this, you can get a pre-check on your passport photo before you submit it with your passport application.
- Full Compatibility: There are some passport photo makers that do not provide the capability of being able to produce a correct biometric photo that is suitable for any country and any document. So whether you need a passport or visa for any country, use a service that provides full compatibility.
- Digital or Printed Delivery: For full flexibility, it can be great to have the option of a digital photo or a printed photo. Sometimes you might need to make a paper application through the post. Where at other times you might need a digital copy of your photo.
- Smartphone iD: Our app can meet all of these criteria, whether it be low-cost or 24/7 customer support, it’s the best passport photo maker to take your passport photo with!
What is the Cost of Taking Passport Photos at Home?
You’ll find that the cost of a compliant passport photo at home will vary from service to service. Equally, the cost of taking passport photos at home can be around 9-20$ USD. This is the most convenient and cheapest way to get pre-approved passport photos.
Use our professional Passport photo app Smartphone iD, to get zero-hassle, pre-approved passport photos. We guarantee that your photos will be accepted by the government. If for some reason they’re not? We’ll send you a full refund.
How to Print a Passport Photo at Home?
If you’ve managed to take a compliant passport photo, you can print it out at home. You’ll need to make sure your photo is compliant with all formatting and size requirements to be able to print it out in an acceptable format.
How to Print a Passport Photo at Home With Smartphone iD
- Take a pre-approved photo using the Smartphone iD app.
- Receive your correctly formatted and sized photo by email.
- Print out using photographic paper.
- If you choose our printing service, get your printed photo delivered straight to your door.
If you’re unable to print out your photo at home, you can use services such as Walmart Photo Centers to get your compliant passport photo printed out.
Take Your Passport Photo With Your Phone at Home
Use Smartphone iD to get pre-approved passport photos at home without any expensive equipment. You can get professional-quality, cheap passport photos from the convenience of your home, just by using your smartphone.
Our team of biometric experts will verify your photos and send them directly to you via email or mail. Whichever you prefer.
Here are some tips to help you get started.
- Make sure to remove your glasses or any accessories covering your face.
- Ensure that there are no shadows covering your face (even lighting across your face).
- Keep a neutral expression whilst keeping the camera at eye level.
- Take your photo then follow the instructions in the Smartphone iD app.
Summary
If you need a compliant passport photo cheap and quick, choose Smartphone iD to get a secure and convenient service. We’ll make sure your passport photos are acceptable to the government, taking care of all the requirements for you. You’ll save time and money without fear of rejection of your passport application. Get started today!
Have you tried using Smartphone iD for your passport photo?